Attention
The DEEP platform is sunsetting.
The DEEP-Hybrid-DataCloud project project has ended and its plaftform and software are being decomissioned during 2023, as they have been superseeded by the AI4EOSC platform and the AI4OS software stack.
Please refer to the following links for further information:
Train a model remotely
This is a step by step guide on how to train a general model from the DEEP Marketplace with your own dataset, in the DEEP Dashboard.
In this tutorial we will see how to retrain a generic image classifier on a custom dataset to create a phytoplankton classifier. If you want to follow along, you can download the toy phytoplankton dataset here.
If you are new to Machine Learning, you might want to check some useful Machine Learning resources we compiled to help you getting started.
Requirements
1. Choose a module from the Marketplace
The first step is to choose a model from the DEEP Open Catalog marketplace. Make sure to select a module with the trainable tag.
For educational purposes we are going to use a general model to identify images.
Some of the model dependent details can change if using another model, but this tutorial will provide
a general overview of the workflow to follow when using any of the models in the Marketplace.
2. Upload your files to Nextcloud
For this example we are going to use DEEP-Nextcloud for storing the dataset you want to retrain the model with.
So login to Nextcloud with your DEEP-IAM credentials and you should access to an overview of your files. Now it’s time to upload your dataset. When training a model, the data has usually to be in a specific format and folder structure. It’s usually helpful to read the README in the source code of the module (in this case located here) to learn the correct way to setting it up.
In the case of the image classification module, we will create the following folders:
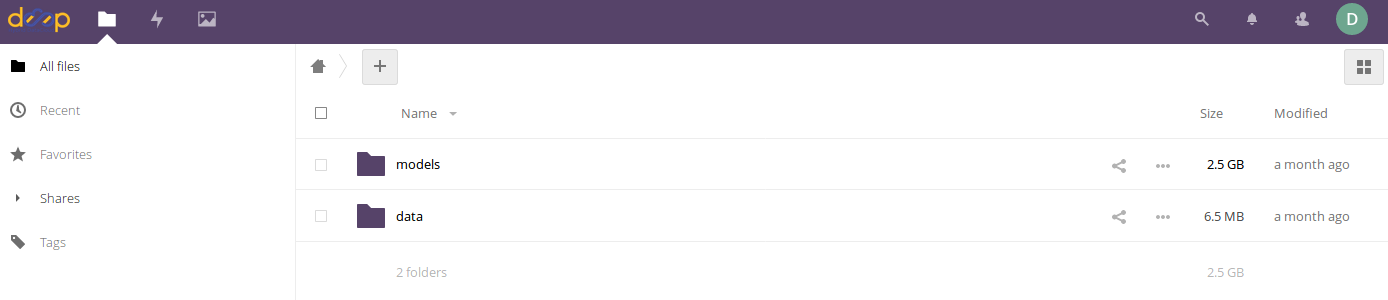
A folder called
modelswhere the new training weights will be stored after the training is completedA folder called
datathat contains two different folders:The sub folder
imagescontaining the input images needed for the trainingThe sub folder
dataset_filescontaining a couple of files:train.txtindicating the relative path to the training imagesclasses.txtindicating which are the categories for the training
Again, the folder structure and their content will of course depend on the module to be used. This structure is just an example in order to complete the workflow for this tutorial.
Once you have prepared your data locally, you can drag your folder to the Nextcloud Web UI to upload it.
If you have your dataset in a remote machine, you will have to install rclone on your remote machine, configure it and do an rclone copy to move your data to Nextcloud.
Tip
Uploading to Nextcloud can be particularly slow if your dataset is composed of lots of small files. Considering zipping your folder before uploading.
$ zip -r <foldername>.zip <foldername>
$ unzip <foldername>.zip
3. Deploy with the Training Dashboard
Now go to the Training Dashboard and login with your DEEP-IAM credentials. Then go to (1) Modules (marketplace) ➜ (2) Train image classifier ➜ (3) Train module.
Now you will be presented with a configuration form. For the purposes of running a retraining, it should be filled as following:
In the General configuration you should select:
Template = default (with storage options), unless stated otherwise in your modules README.Command = JupyterLabbecause we want the flexibility of being able to interact with the code and the terminal, not just the API.Hardware configuration = GPUbecause training is a very resource consuming task.Docker tag = gpubecause Docker tag has to match the hardware it will be run on.
Once this is set, you can proceed to fill the Specific configuration:
jupyter password, you have to provide a password at least 9 characters long, so that nobody will be able to access your machine, which will be exposed on a public IP.rclone_user,rclone_password: those are the credentials to be able to mount your Nextcloud directory in your deployment. Go here in order to find how to create them.
Now that you are done configuring, click Submit to create the deployment. See the Dashboard guide for more details.
4. Go to JupyterLab and mount your dataset
After submitting you will be redirected to the deployment’s list.
In your new deployment go to Access and choose JupyterLab. You will be redirected to http://jupyterlab_endpoint
Now that you are in JupyterLab, open a Terminal window ( (New launcher) ➜ Others ➜ Terminal).
First let’s check we are seeing our GPU correctly:
$ nvidia-smi
This should output the GPU model along with some extra info. We can also check rclone is correctly configured with:
$ rclone about rshare:
which should output your used space in Nextcloud.
Tip
If you happen to need additional packages, you will have to update the package index first. Note that sudo is not needed as you are always root in your Docker containers:
$ apt update
$ apt install vim
Now we will mount our remote Nextcloud folders in our local containers:
$ rclone copy rshare:/data/dataset_files /srv/image-classification-tf/data/dataset_files
$ rclone copy rshare:/data/images /srv/image-classification-tf/data/images
Paths with the rshare prefix are Nextcloud paths.
As always, paths are specific to this example. Your module might need different paths.
If you zipped your files before uploading to Nextcloud you will have to rclone copy the zip file,
unzip it and copy the contents to the appropriate folders.
Mounting your dataset might take some time, depending on the dataset size, file structure (lots of small files vs few big files), and so on. So grab a cup of coffee and prepare for the next steps.
Now that you dataset is mounted, we will run DEEPaaS to interactively run the training. In your terminal window type:
$ nohup deep-start --deepaas &
The & will keep your command running even if you close the terminal, and nohup will produce a log file
nohup.out that you can always look at if you want to know what is going on under the hood.
5. Open the DEEPaaS API and train the model
Now go back to the deployments list view.
In your deployment go to Access and choose DEEPaaS. You will be redirected to http://deepaas_endpoint/ui.
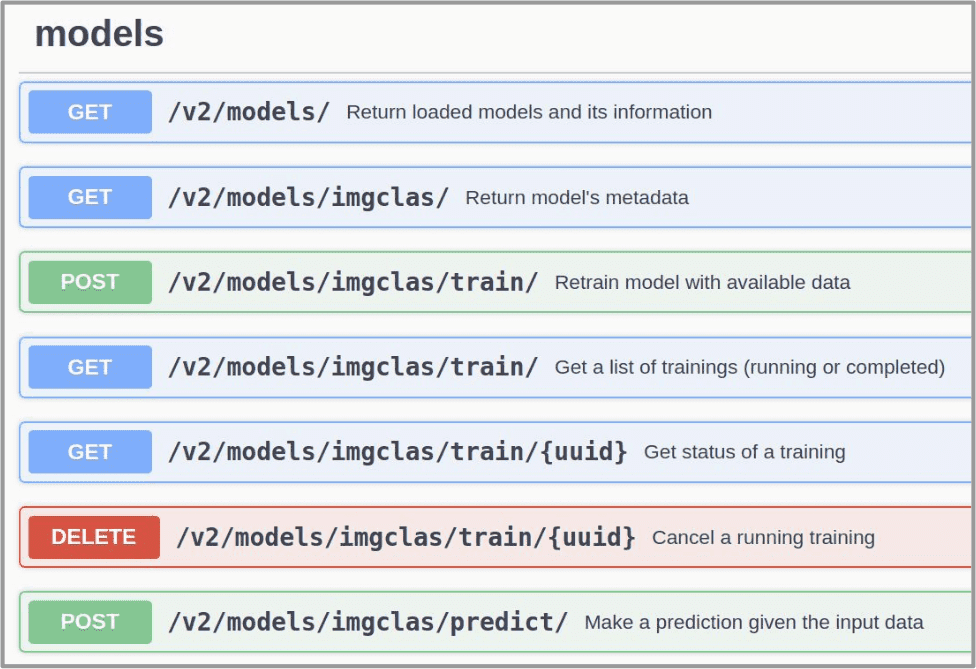
Look for the train POST method. Modify the training parameters you wish to change and execute.
If some kind of monitorization tool is available for the module, you will be able to follow the training
progress at http://monitor_endpoint (click Access button ➜ Monitoring, in the deployments page).
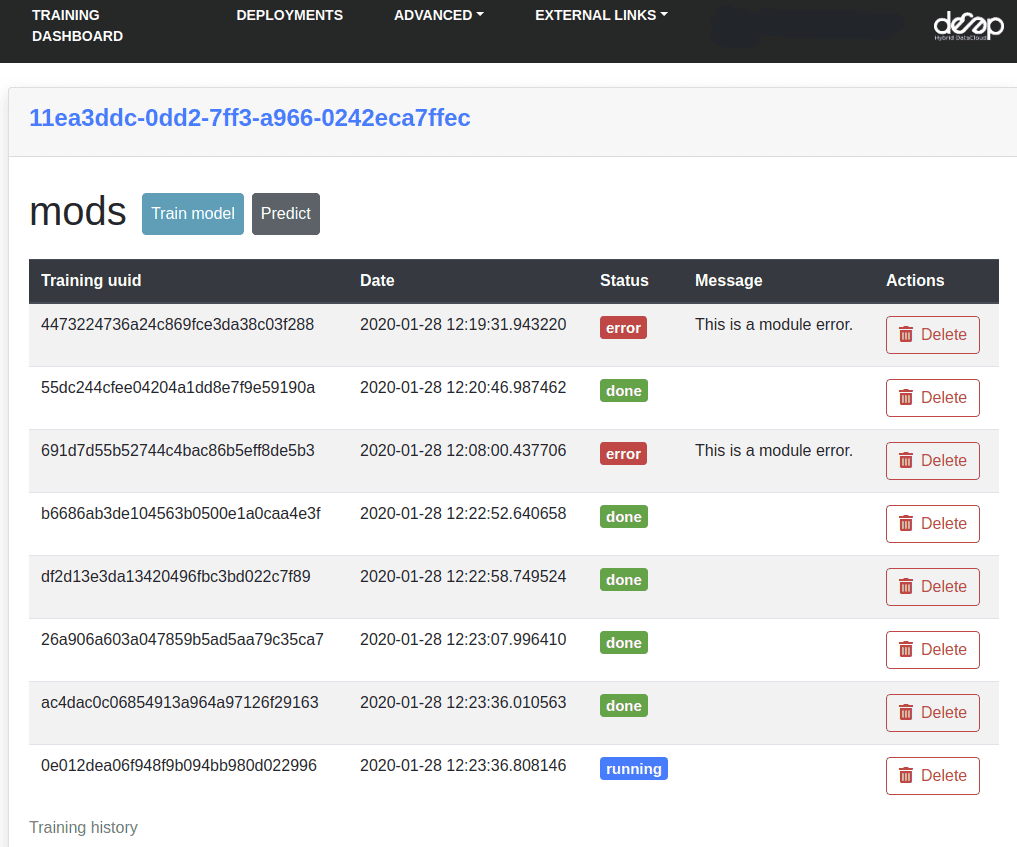
In Access ➜ History you will be able to see the status of your current training as well as old ones.
6. Test and export the newly trained model
Once the training has finished, you can directly test it by clicking on the predict POST method.
For this you have to kill the process running deepaas, and launch it again.
$ kill -9 $(ps aux | grep '[d]eepaas-run' | awk '{print $2}')
$ kill -9 $(ps aux | grep '[t]ensorboard' | awk '{print $2}')  # optionally also kill monitoring process
This is because the user inputs for deepaas are generated at the deepaas launching.
Thus it is not aware of the newly trained model. Once deepaas is restarted, head to the
predict POST method, select you new model weights and upload the image your want to classify.
If you are satisfied with your model, then it’s time to save it into your remote storage,
so that you still have access to it if your machine is deleted.
For this we have to create a tar file with the model folder (in this case, the foldername is
the timestamp at which the training was launched) so that we can download in our Docker container.
So go back to JupyterLab, open a Terminal window and run:
$ cd /srv/image-classification-tf/models
$ tar cfJ <modelname.tar.xz> <foldername>
$ rclone copy /srv/image-classification-tf/models rshare:/models
Now you should be able to see your new models weights in Nextcloud.
For the next step, you need to make them publicly available
through an URL so they can be downloaded in your Docker container.
In Nextcloud, go to the tar file you just created:
➜ Share Link ➜ (Create a new share link)
Optionally, in order to improve the reproducibility of your code, you can share the dataset you trained on. If your dataset is not already publicly available, we have a Zenodo community we you are more than welcomed to contribute your dataset.
7. Create a Docker repo for your new module
Now, let’s say you want to share your new application with your colleagues. The process is much simpler that when developing a new module from scratch, as your code is the same as the original application, only your model weights are different.
To account for this simpler process, we have prepared a version of the the DEEP Modules Template specially tailored to this task.
In your local machine (not the Dashboard deployment), run the Template with the child-module branch.
$ pip install cookiecutter
$ cookiecutter https://github.com/deephdc/cookiecutter-deep --checkout child-module
Proceed to answer the questions you will be prompted.
This will create a single repo (DEEP-OC-**) with the Docker code.
Once this is done, the following steps are:
(1) Modify metadata.json with the proper description of your new module.
This is the information that will be displayed in the Marketplace.
Among the fields you might need to edit are:
title(mandatory): short title,summary(mandatory): one liner summary of your module,description(optional): extended description of your module, like a README,keywords(mandatory): tags to make your module more findabletraining_files_url(optional): the URL of your model weights and additional training information,dataset_url(optional): the URL dataset URL,cite_url(optional): the DOI URL of any related publication,
Most other fields are pre-filled via the cookiecutter and usually do not need to be modified. Check you didn’t mess up the JSON formatting by running:
$ pip install git+https://github.com/deephdc/schema4apps
$ deep-app-schema-validator metadata.json
Due to some issues with the JSON format parsing avoid using : in the values you are filling.
(2) Then go to the Dockerfile. You will see that the base Docker image
is the image of the original repo. Modify the appropriate lines to replace
the original model weights with the new model weights.
In our case, this could look something like this:
ENV SWIFT_CONTAINER https://data-deep.a.incd.pt/index.php/s/r8y3WMK9jwEJ3Ei/download
ENV MODEL_TAR phytoplankton.tar.xz

RUN rm -rf image-classification-tf/models/*
RUN curl --insecure -o ./image-classification-tf/models/${MODEL_TAR} \
    ${SWIFT_CONTAINER}/${MODEL_TAR}
RUN cd image-classification-tf/models && \
    tar -xf ${MODEL_TAR} &&\
    rm ${MODEL_TAR}
Check your Dockerfile works correctly by building it locally and running it:
$ docker build --no-cache -t your_project .
$ docker run -ti -p 5000:5000 -p 6006:6006 -p 8888:8888 your_project
Your module should be visible in http://0.0.0.0:5000/ui
Once you are fine with the state of your module, got to Github to create the repo
https://github.com/<github-user>/DEEP-OC-<project-name> and push the changes.
9. [optional] Add your new module to the original Continuous Integration pipeline
Your module is already in the Marketplace. But what happens if the code in the original image-classification module changes? This should trigger a rebuild of your Docker container as it is based on that code.
This can be achieved by modifying the Jenkinsfile in the image-classification Docker repo.
One would add an additional stage to the Jenkins pipeline like so:
stage("Re-build DEEP-OC Docker images for derived services") {
    when {
        anyOf {
           branch 'master'
           branch 'test'
           buildingTag()
        }
    }
    steps {

        // Wait for the base image to be correctly updated in DockerHub as it is going to be used as base for
        // building the derived images
        sleep(time:5, unit:"MINUTES")

        script {
            def derived_job_locations =
            ['Pipeline-as-code/DEEP-OC-org/DEEP-OC-plants-classification-tf',
             'Pipeline-as-code/DEEP-OC-org/DEEP-OC-conus-classification-tf',
             'Pipeline-as-code/DEEP-OC-org/DEEP-OC-seeds-classification-tf',
             'Pipeline-as-code/DEEP-OC-org/DEEP-OC-phytoplankton-classification-tf'
             ]

            for (job_loc in derived_job_locations) {
                job_to_build = "${job_loc}/${env.BRANCH_NAME}"
                def job_result = JenkinsBuildJob(job_to_build)
                job_result_url = job_result.absoluteUrl
            }
        }
    }
}
So if you want this step to be performed, you must submit a PR to the original module Docker repo with similar changes as above.